How to Automate Customer Onboarding Using Make & Airtable
Why Customer Onboarding Fails (And How Automation Fixes It)
More than half of all SaaS users who complete a trial or purchase a software tier drop out during their first week. In most operations, the root cause isn't product quality—it is delayed onboarding execution. When a new account signs up, momentum peaks instantly. If your customer success team manually formats spreadsheets, builds custom Slack rooms hours later, or delays user provisioning until the next morning, that crucial momentum evaporates.
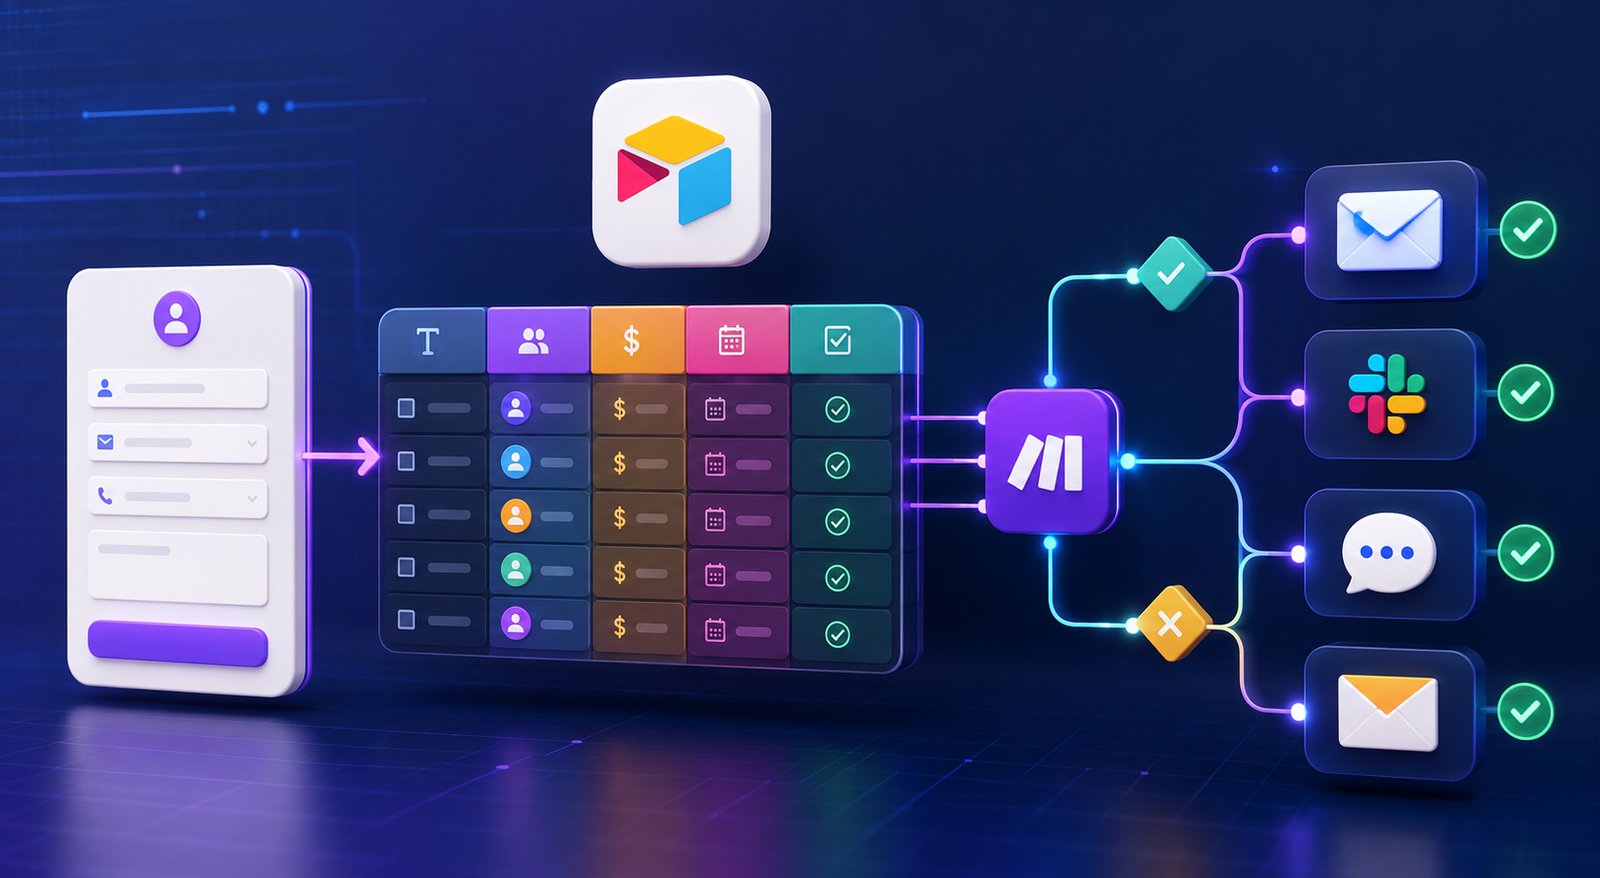
Learning how to automate customer onboarding using Make and Airtable bridges the gap between sign-up and product activation. Airtable acts as your relational data store—organizing client profiles, onboarding checklists, and health metrics. Make acts as the orchestration engine—monitoring database updates, evaluating conditional logic, sending transactional communications, and provisioning third-party software accounts in real time.
By replacing manual administrative tasks with an automated onboarding architecture, you minimize data entry errors, accelerate time-to-first-value, and give your customer success managers space to focus on high-touch strategy.
The Core Architecture: Airtable + Make Stack
Building an enterprise-ready onboarding system requires a clear division of responsibilities between your database and your automation runner. Attempting to force Airtable to handle complex multi-app branching through basic native automations—or using Make as a persistent database—creates brittle systems that fail at scale.
Airtable: The Relational Data Hub
Airtable serves as your single source of truth. Unlike traditional flat spreadsheets, Airtable supports relational links across multiple operational tables:
- Accounts Table: Tracks company-level metadata, subscription plans, renewal dates, and overall onboarding status.
- Contacts Table: Stores individual stakeholder records, permission roles, email addresses, and magic login links.
- Onboarding Checklists Table: Houses standardized milestone tasks linked to specific accounts for progress tracking.
- Activity Logs Table: Maintains audit trails for every webhook trigger, automated email dispatch, and completed milestone.
Make: The Event-Driven Orchestration Engine
Make monitors changes within Airtable and external platforms. When a record enters a designated view or an external web form receives an entry, Make triggers a scenario—a visual pipeline of automated execution steps:
- Trigger Phase: Catch instant webhooks from checkout platforms or poll filtered Airtable views for new sign-ups.
- Routing & Logic Phase: Evaluate customer plan tiers and direct the data flow through specialized execution branches.
- Action Phase: Provision software seats, construct shared folders, trigger messaging channels, and update status fields back in Airtable.
Step-by-Step Guide: Building Your Automated Onboarding Engine
Follow this concrete setup guide to build an end-to-end onboarding workflow that ingests new sign-ups, builds custom workspaces, sends notifications, and updates database records automatically.
Step 1: Design the Airtable Base Structure
Set up your database architecture in Airtable by creating a base titled Customer Onboarding Hub containing three primary tables:
- Clients Table:
- Company Name (Single Line Text)
- Status (Single Select: New, Onboarding In-Progress, Active, At-Risk)
- Plan Tier (Single Select: Starter, Growth, Enterprise)
- Primary Contact Email (Email)
- Kickoff Completed (Checkbox)
- Created Date (Created Time)
- Onboarding Tasks Table:

- Task Name (Single Line Text)
- Client (Link to Clients Table)
- Owner (User or Collaborator)
- Due Date (Date)
- Status (Single Select: Pending, Done)
- Filtered View for Automation:
- Create a dedicated grid view in the Clients Table titled Ready for Onboarding. Add a filter rule: Status equals New AND Primary Contact Email is not empty. Make will monitor this exact view.
Step 2: Configure the Make Scenario Trigger
Log into Make, create a new scenario, and select the initial module to interface with your database.
- Select the Airtable - Watch Records module.
- Connect your Airtable account and select the Customer Onboarding Hub base and Clients table.
- Choose the Ready for Onboarding view as your trigger source.
- Set the batch execution limit to 10 to maintain steady throughput during sign-up spikes.
Operational Tip: For instant execution without polling delays, replace the polling module with an Airtable Webhook trigger or an upstream payment event such as Stripe - Watch Events (Charge Succeeded).
Step 3: Branch Workflows Based on Customer Tier
Different customer tiers demand distinct onboarding experiences. Self-serve customers thrive on guided email onboarding, whereas enterprise accounts expect dedicated communication channels and custom asset storage.
- Insert a Router module in Make directly after the Airtable trigger module.
- Branch 1 (Self-Serve / Starter Tier):
- Set the filter condition: Plan Tier equals Starter.
- Action: Trigger an automated welcome message via Gmail, SendGrid, or Resend containing personalized magic links and video walkthroughs.
- Branch 2 (Enterprise Tier):
- Set the filter condition: Plan Tier equals Enterprise.
- Action 1: Create a private communication channel using the Slack - Create a Channel module.
- Action 2: Build a shared Google Drive directory structure using the Google Drive - Create a Folder module.
- Action 3: Assign a dedicated Customer Success Manager to the account in Airtable.
Step 4: Generate Standardized Onboarding Tasks Automatically
Rather than adding onboarding checklists manually, configure Make to generate default task records in Airtable automatically.
- Attach an Airtable - Create a Record module to your execution branches.
- Target the Onboarding Tasks Table.
- Map the Client field to the record ID fetched during Step 2.
- Define core checklist items such as Verify Domain Settings, Schedule Kickoff Call, and Issue API Credentials.
- Use Make's Iterator module to cycle through an array of task items, creating multiple checklist records in a single scenario run.
Step 5: Update Master Status & Send Internal Alerts
Conclude your scenario by updating the client's master record and alerting your internal team.
- Add an Airtable - Update a Record module at the end of each path.
- Change the client's Status field from New to Onboarding In-Progress.
- Updating this field automatically removes the record from the Ready for Onboarding view, preventing duplicate scenario runs.
- Send an automated alert to your internal team channel summarizing account details and team assignments.
Make vs. Zapier for Customer Onboarding
Choosing between Make and Zapier for onboarding automation comes down to pipeline complexity, data structure demands, and monthly operation volume.
| Feature / Capability | Make (Integromat) | Zapier | Operational Impact for Onboarding |
|---|---|---|---|
| Data Flow Visualizer | Multi-branch drag-and-drop canvas with live execution tracking | Vertical linear step-by-step list | Make simplifies visual debugging across complex multi-tier onboarding paths. |
| Cost at Scale | Operations-based pricing model | Task/Zap execution model | Make remains significantly more cost-effective when generating 10+ sub-tasks per account. |
| Data Parsing Functions | Native array iterators, aggregators, and custom JSON parsers | Requires custom Code steps or multi-zap paths | Make handles complex webhooks and nested user arrays without writing external code. |
| Error Handling | Advanced directives (Rollback, Commit, Resume, Ignore, Break) | Basic execution halt or global retries | Make handles third-party API outages smoothly without leaving half-created customer records. |
| Learning Curve | Moderate; requires basic data mapping understanding | Low; highly intuitive for beginner users | Zapier is faster for simple 2-step workflows; Make excels at enterprise architectures. |
For growing teams handling multi-branch B2B onboarding, Make delivers superior data handling, robust error resilience, and lower operational overhead.
5 Critical Onboarding Automations You Should Implement Right Now
Once your primary setup is running, strengthen your customer journey with these high-impact automation recipes.
1. Dynamic Kickoff Calendar Schedulers
Skip static scheduling links. Use Make to assemble dynamic calendar links pre-populated with customer names, emails, and account IDs. When an appointment is scheduled via Calendly, route the booking webhook back through Make to record the Kickoff Date in Airtable and mark the scheduling task complete.
2. Automated Intake Form Reminders

Incomplete client data stalls onboarding momentum. Build an intake form in Airtable Forms, Tally, or Fillout. Use Make to evaluate form submission status 48 hours post-checkout. If required inputs are missing, dispatch an automated notification pointing the user directly to incomplete fields.
3. Early Activation Health Alerts
Track early product usage milestones inside Airtable to catch churn risks before they compound. Connect your product analytics events (such as Workspace Configured or Teammate Invited) to Airtable. Run a daily Make scenario that flags accounts where status equals Onboarding In-Progress for over 5 days without key activation triggers, alerting account managers immediately.
4. Automated Slack Connect Channel Creation
For high-value accounts, manually inviting client teams to shared channels slows response times. Use Make's Slack integration to create private channels automatically, generate Slack Connect invitation links, and dispatch them to primary client contacts upon contract signature.
5. Automated Contract and Invoice Generation
When sales reps mark deals as closed in your CRM or Airtable base, pass record parameters into document engines like PandaDoc or DocuSign via Make. Automatically generate customized service agreements, save generated PDFs directly into Airtable, and email them to stakeholders.
Common Pitfalls & Error Handling Strategies
Automation systems require deliberate guardrails to prevent silent errors, duplicated communications, and rate-limit bottlenecks. Prepare for these technical edge cases:
1. Preventing Infinite Scenario Loops
If a Make scenario monitors updated Airtable records and modifies the same record upon completion without precise filters, it can trigger an infinite loop that consumes your monthly operations quota rapidly.
- Resolution: Filter your trigger views strictly on status values (e.g., Status = New). Update the record status to Processing or In-Progress during execution so it clears the trigger view immediately.
2. Managing API Rate Limits
Airtable imposes rate limits of 5 requests per second per base on standard plans. Bulk imports or sudden promotional surges can lead to 429 Too Many Requests response errors.
- Resolution: Implement Make's Break Router or apply rate-limiting parameters within scenario settings to throttle request speeds safely within API thresholds.
3. Handling Null Data Fields
Missing data inputs—such as a blank company name—can break downstream modules that depend on string variables.
- Resolution: Use Make's native ifEmpty() logic to assign default fallbacks. For example: ifEmpty(1.companyName; 'Your Organization') ensures downstream modules always receive valid text strings.
Real-World Case Example: SaaS Onboarding Transformation
Consider a growing B2B software business expanding from 50 to 300 monthly accounts.
Manual Process (Before)
- Sales representatives manually copied payment records from Stripe into spreadsheets.
- Customer success teams spent 30+ minutes per client building Google Drive folders, typing welcome notes, and mapping tasks.
- Average time from payment to account activation: 18 hours.
- Customer drop-off during onboarding: 28%.
Automated Make + Airtable Pipeline (After)
- Stripe payment events trigger Make scenarios instantly.
- Account metadata and contact roles sync to Airtable automatically.
- Make branches execution: self-serve users enter dynamic product sequences, while enterprise accounts receive auto-generated Slack Connect rooms and workspace templates.
- Average time from payment to account activation: 45 seconds.
- Customer drop-off during onboarding: Dropped to 8%.
- Team time saved: Over 140 operational hours saved every month.
Key Metrics to Track
Track these four core indicators in your Airtable reporting views to measure onboarding efficiency:
- Time-to-First-Value (TTFV): Elapsed time between initial payment and the user completing their first meaningful product action.
- Onboarding Completion Rate: The percentage of new accounts completing 100% of their checklist items within 14 days.
- Manual Touchpoint Ratio: The proportion of onboarding runs requiring manual support intervention due to process gaps.
- 30-Day Account Retention: Retention rate comparisons between users who complete automated onboarding versus those who stall.
Scale Your SaaS Operations Effortlessly
Automating your customer onboarding pipeline with Make and Airtable converts a manual administrative burden into a fast, reliable growth engine. Providing immediate value to every account upon sign-up boosts user activation, protects recurring revenue, and strengthens your operational foundation.
At Saasbonus, we thoroughly test and review top software platforms, no-code tools, and operational workflows. Explore our in-depth software reviews and implementation guides at Saasbonus to build a more efficient software stack today.